 Study Mode
 Practice Mode
 Analyze Mode
 GTO Wizard AI
 Account & Subscription FAQ
 Contact
How To Build Custom Solutions
Say goodbye to the limitations of presolved solutions with GTO Wizard AI!
In the past, we solved spots using traditional solvers and then uploaded them to a library of solutions. Presolved solutions are fast and useful, but this meant users couldn’t change anything about the spot. This is where GTO Wizard AI comes in.
With custom solving, you can change every parameter and solve it in seconds!
- Edit the player’s ranges
- Change the stack and pot size
- Add or remove actions
- Customize the betting tree
- Automatically simplify and optimize your bet sizes
- Nodelock and solve exploitative strategies (coming soon)
Solution Builder Basics
Getting Started
GTO Wizard AI Custom Solving is a feature exclusive to Elite Tier members. However, all users can solve one flop for free: Q♠T♠7♥. To start, open Study Mode, click the solution selector in the top-left corner, click the Custom Solutions tab, and create a new solution!
This opens the Solution Builder, where all the magic happens. You can change the ranges, stack, pot, and customize the betting tree from here.

Prefill Spots
The prefill button lets you import the ranges, stack, and pot from a pre-solved GTO Wizard solution.
Select the PREFILL button in the top-left corner to open the PREFILL menu.

Choose your solution at the top of this dialog box, select the positions, then enter the preflop actions to quickly import everything.

Starting Street

This setting determines the starting point of your solution.
- Currently (April 2024) solving is limited to heads up spots only.
- Multiway preflop solving is on our roadmap. Check out the upcoming features here.
Stack and Pot

You can set the stack and pot size in increments of 0.1bb. There are two constraints:
- In order to ensure accuracy, the stack-to-pot ratio should not exceed 100. That means the stack cannot be larger than 100 times the pot.
- The maximum stack or pot is 999. If you play high stakes, convert your stack and pot to big blinds rather than entering a dollar value.
Edit Ranges
Open the range editor by selecting either player’s range in the Solution Builder. From here, you can edit, save, and load all player’s ranges.

Select either of the range previews to edit that player’s range.

You can assign labels to each range, such as IP, OOP, or seat names. Note that labels do not affect the solution. They are merely organizational tools.
There are several ways to work with ranges:
- Manually paint the range with your mouse.
- Use the From and To boxes/Slider to change how wide the range is on a linear scale.
- Use the Weight box to set how often different hands should be in your range. Alternatively, you can scroll over a hand with your mouse wheel to change the weight.
- Import ranges from other software or other GTO Wizard spots using the import button. This will open a Dialog box that allows you to paste the ranges as text.
- Export ranges to other software. This will copy the range as text in standard UPI format.
- Save your custom ranges for future use. Click here to learn how to organize your ranges with tags!
- Click this ⇄ icon to swap the IP and OOP player’s ranges. Keep in mind that labels will not be swapped.
Building the Betting Tree
The Betting Tree defines what actions players can take during a hand.
Open the Bet sizes dropdown menu to customize the betting tree.

Automatic, Fixed, and Dynamic
What is the difference between Automatic, Dynamic, and Fixed bet sizes?
- Automatic – GTO Wizard automatically simplifies to the best, highest EV size(s) at each decision point.
(Automatic is the best option for newer users!)
- Dynamic – Choose how many bet or raise sizes you want, and GTO Wizard will automatically simplify to the optimal (highest EV) sizings at each decision point. You can also specify what sizes the dynamic algorithm should consider before simplifying.
(Choose Dynamic to build powerful simplified strategies)
- Fixed – Specify precisely what bet or raise sizes are allowed at each decision point. This is similar to traditional solver inputs. Your betting tree will NOT be simplified.
(Use Fixed to build more complex trees, force specific sizes to be used, or to manually simplify the strategy after solving with node editing)
Want to learn more about how we find optimal bet sizes? Curious about how accurate our simplifications are? Read this article!
Bet sizing input
You can enter bet/raise sizes as a percentage of the pot (%), as a geometric size (e), or as a multiple of the previous bet (x). To switch between them, hover your mouse over the (% / e / x) icons to open a dropdown menu and change the input type.

Specify Sizes To Compare
You can tell the solver exactly what sizes it should consider before simplifying. This is useful if you use predetermined sizes online or prefer particular bet or raise sizes in different spots.
Select Dynamic mode, then toggle the switch labeled Specify Sizes to Compare. From here, you can list every size the dynamic algorithm should consider when building your strategy.
In this example, I’ve asked the solver to simplify to 1 bet and 1 raise size at each decision point. It will choose from this list of sizes before simplifying.

Note that different decision points (AKA nodes) may be simplified to different sizes depending on what’s best! We’re not telling the solver to choose the same size for every spot; we’re telling it to choose the best size in every spot.
Customize Streets/Players Separately
By default, IP (In Position) inherits the betting tree settings from OOP (Out Of Position), and Turns/Rivers inherit the settings from the Flop. However, you can change that if you wish. Toggle these switches to customize the betting tree for each player and each street. Use the Flop, Turn, and River tabs to customize each street.
In the example below, OOP is using an automatically optimized river strategy, whereas IP will always have a 50% and 100% bet size, and a 66% raise size on the river.

Preflop Tree Builder
GTO Wizard now supports preflop solving.
Multiway preflop solving requires an Ultra subscription, while heads-up preflop can be solved with an Elite subscription. However, anyone can solve spots at stack depths of 10bb or less to test the features.
To begin, select Preflop at the top of the page. The available tree builder options will change depending on whether you are solving heads-up or multiway preflop.
Solution Setup
Most of the core configuration happens inside the Solution card. This is where you define the structure of the game before solving. You can choose the number of players dealt into the hand, set the stack sizes, configure the blinds and antes, add rake, and enable straddles or limps. You can also assign a profile to each player if you want to model exploitable tendencies instead of a purely equilibrium solution.
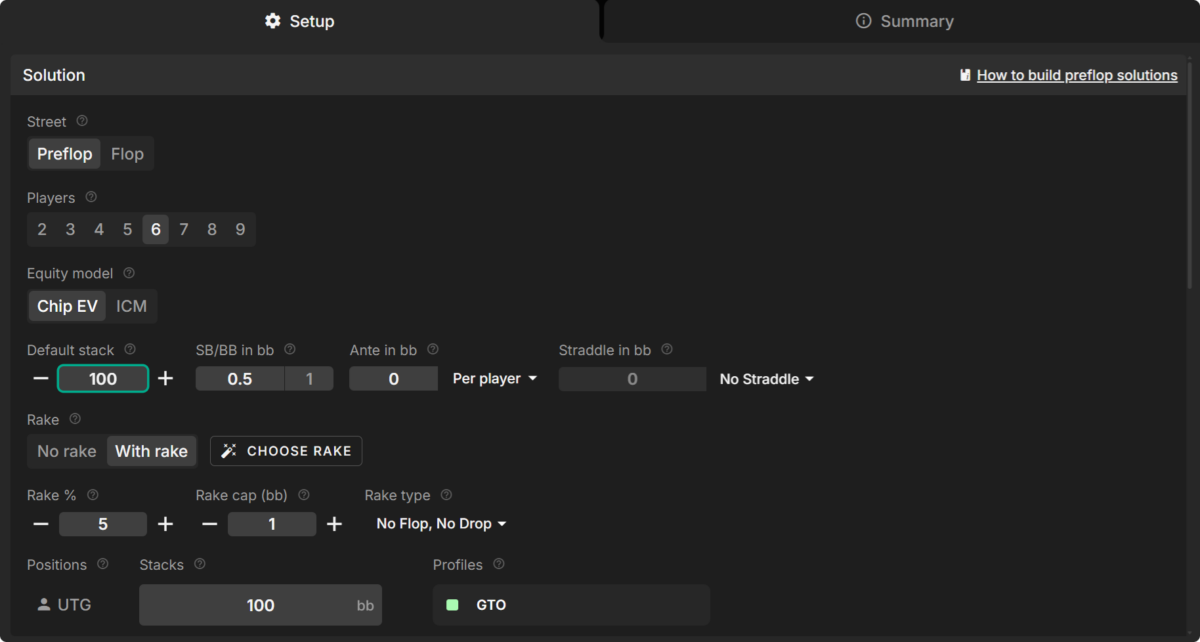
Equity Model
The Equity Model determines what the solver is trying to maximize. Chip EV is used when the goal is simply to win the most chips, which is the standard approach for most games. ICM assesses chip value using the Independent Chip Model, where chips are worth different amounts depending on survival pressure, making it the correct choice for late-stage tournaments.
Rake
The Rake settings are used for cash game solves. Rake represents the portion of the pot taken by the house at the end of the hand. You can configure both the Rake %, which is the percentage of the matched pot that is removed, and the Rake cap, which is the maximum amount of rake that can be taken in a single hand, measured in big blinds.
Stack Sizes and Blinds
Default Stack sets the starting stack depth in big blinds for all players. You can then override this value for individual positions if needed. SB/BB in bb controls the size of the small blind relative to the big blind. For example, this would be 0.5 in a standard 1/2 structure, or 0.4 in a 2/5 structure. These settings let you accurately model the blind structure of the game you want to solve.
Antes
The Ante setting controls how antes are posted. There are three formats available:
- Per player means each player contributes the stated ante individually.
- Total means the total ante amount is spread across the table and sums to the value you enter.
- BB Ante means only the Big Blind posts the ante, which is standard in live tournament formats.
Straddles
The Straddle setting allows you to model games where an additional blind is posted before the cards are dealt. When a straddle is present, action starts to the left of the final straddler, and that player acts last preflop. There are three types of straddles to choose from:
- A Single straddle means UTG posts the straddle and action begins with UTG+1.
- A Double straddle means both UTG and UTG+1 straddle, so action begins with UTG+2.
- A Mississippi straddle allows the straddle to come from a non-blind position, with action starting to the left of that player.
Profiles
Profiles let you apply exploitable player tendencies to individual seats. This can be useful when you want to model non-GTO behavior or build trees against customized opponents. Profiles are configurable, so you can tailor them to the type of player or environment you want to study. Learn More.
Bet Sizes
The multiway preflop Bet sizes menu allows you to efficiently customize the preflop betting tree.
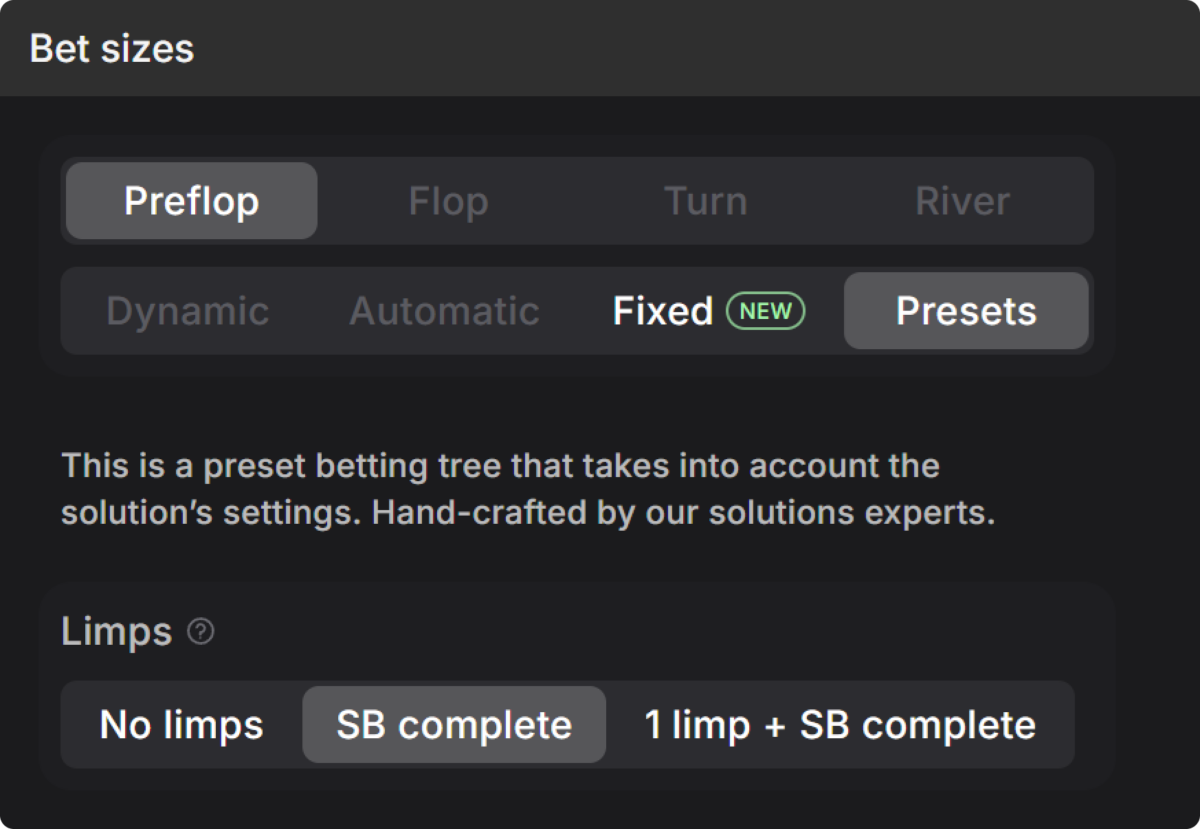
Presets
The Limps setting in Presets controls whether players are allowed to enter the pot by calling the Big Blind instead of raising. No limps means players can only raise or fold in an unopened pot. SB complete allows only the Small Blind, when action folds to them, to complete rather than raise. 1 limp + SB complete allows one non-small-blind player to limp, and also allows the Small Blind to over-limp.
Selecting Presets creates a pre-made betting tree that can be viewed and adjusted manually in the Tree edit section. The presets are human-guided heuristics that adjust with SPR. They’re designed to be a quick starting point, but they’re not fully optimized.
Fixed
Selecting Fixed opens a menu that allows you to customize the preflop tree with much more control. You can apply different sizing schemes to different positions, set in-position and out-of-position raise sizes separately, scale raise sizes when facing limpers or cold-callers, and choose which positions can limp or cold-call. Fixed mode supports the same bet sizing inputs as postflop trees: pot percentage (%), multipliers (x), big blinds (bb), and geometric sizes (e).

Select +Add New to create different rules for different positions. You can also copy bet sizing rules to other positions. Select which sizes should be copied copy over, and what positions they apply to, using this menu.
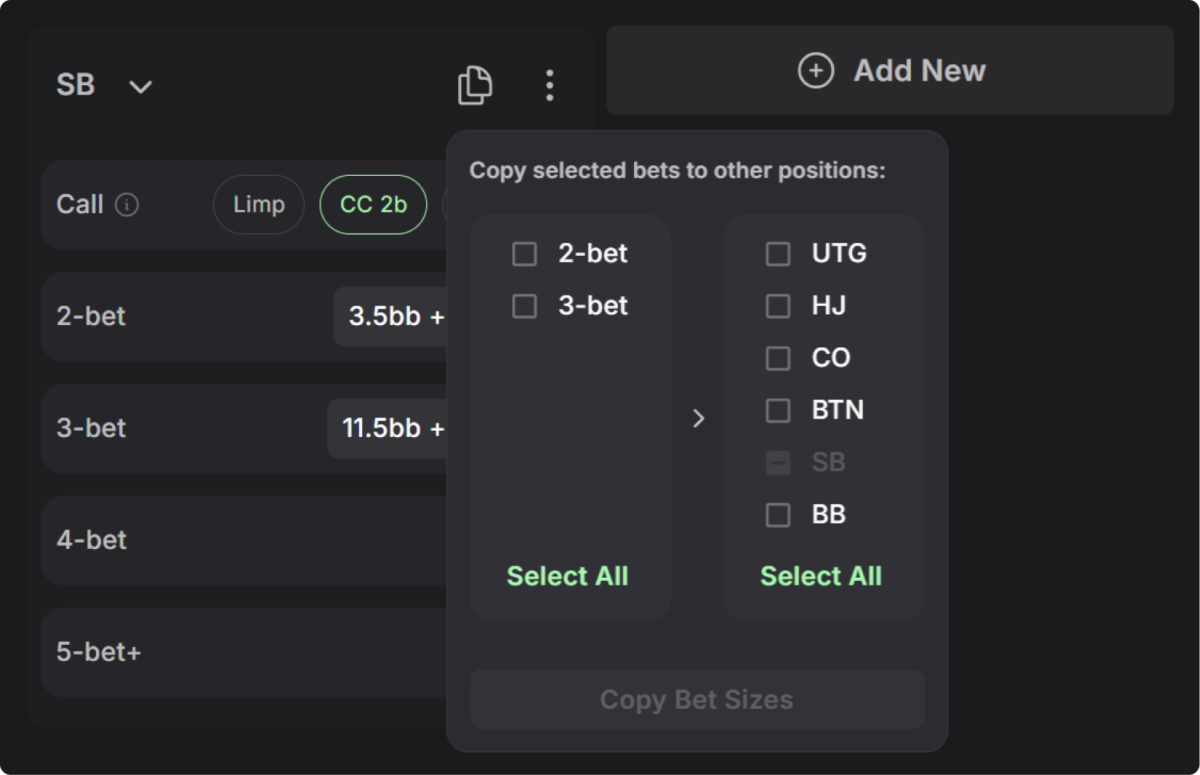
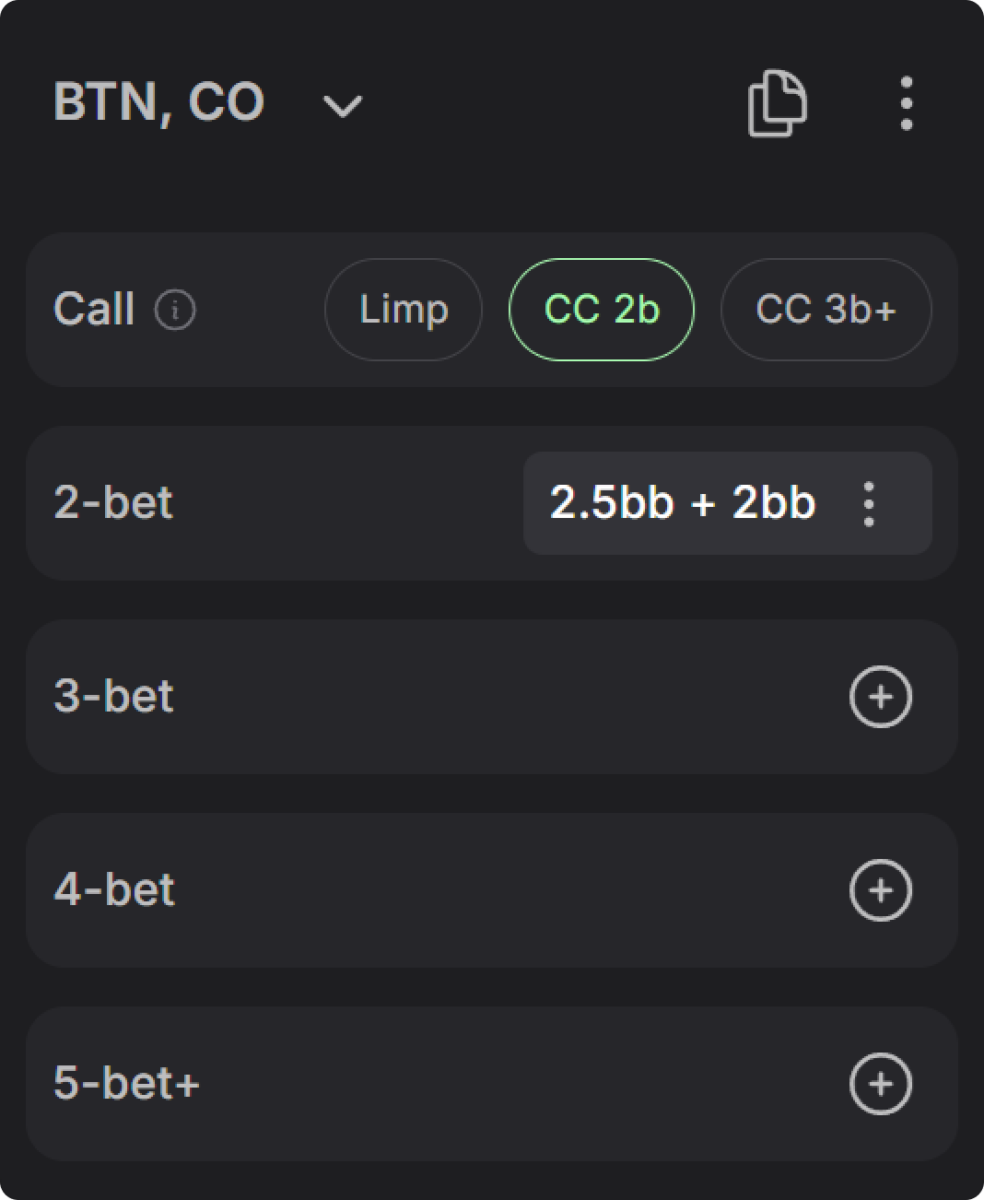
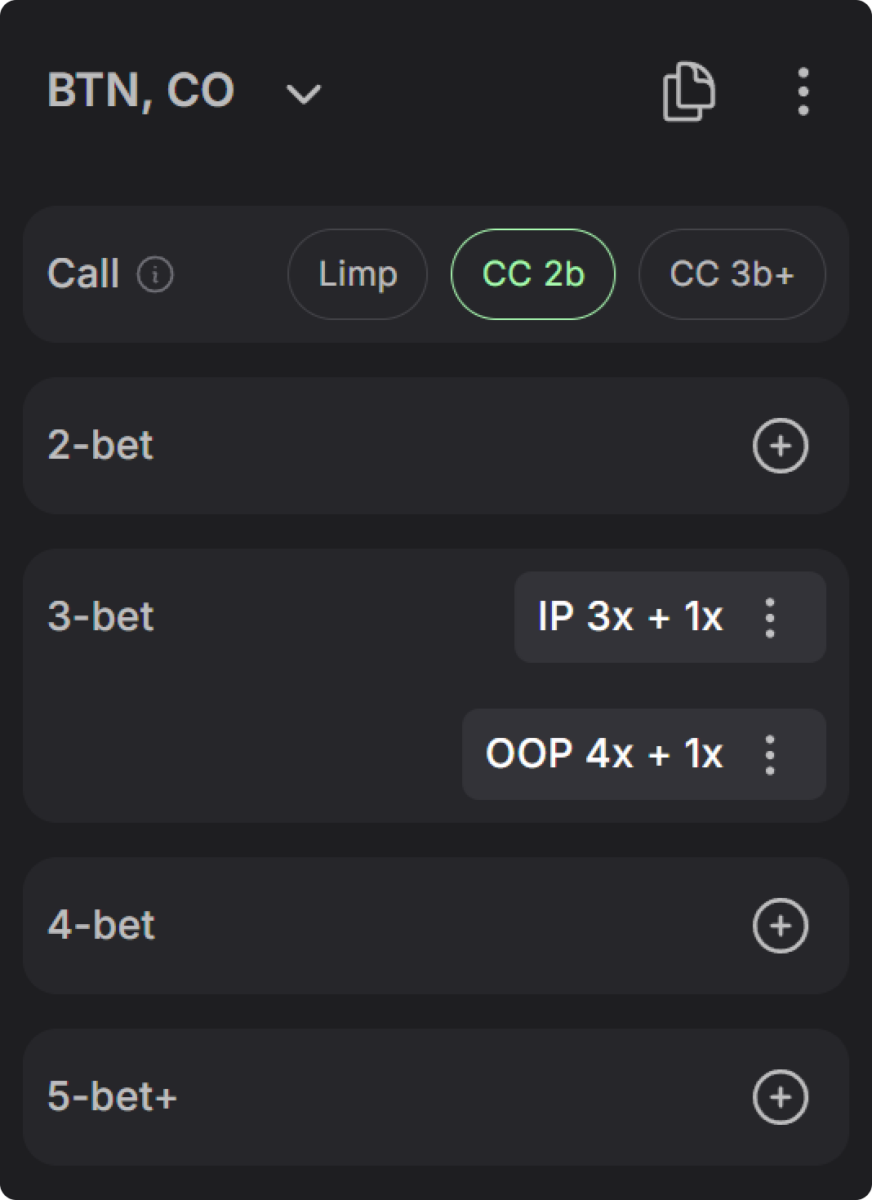
Calls
The Call settings determine which passive actions are allowed. Limp allows a player to limp in. CC 2b allows a player to cold-call a 2-bet without having already put money in the pot. CC 3b+ allows a player to cold-call a 3-bet or higher without having already put money in the pot. Turning a cold-call option off forces a raise-or-fold response, which is a standard simplification in many trees.
2-Bet
The 2-bet section controls open raises and isolation raises. The +ISO option increases the size for each limper. For example, this setting opens to 2.5bb plus 2bb for every limper.
3-Bet
For example, this setting 3-bets 3x in position and 4x out of position, with an extra multiple per cold-caller.
The 3-bet, 4-bet, and 5-bet+ sections control how you re-raise. These can be set separately for in-position and out-of-position play. You can also use +SQZ to increase the 3-bet size when squeezing.
Workflow
The best way to use the preflop solver is to build a solid default tree that you can reuse in a wide variety of spots. Start by setting the blind structure, rake, stacks, and other game details. Then customize the betting tree using the Fixed sizes menu. Create different rules by position, and use Tree edit at the bottom to fine-tune specific nodes as needed.
Once you’re satisfied with the tree, save it for later use. That gives you a reusable starting point for future solves. From there, you can layer on extra complexity like mixed stacks, exploitable profiles, or unusual sizings, only when needed.
For example, this tree was designed to be a solid starting point for 100bb cash games. Try it here.

Sharing
You can share your work with your colleagues, study partners, or students in two ways:
- Import/Export in the Saved parameters menu.
- Solve the customized tree once, click the pencil icon to edit the solution, then copy the URL in your browser. Anyone who opens that link will see a tree builder with your settings.
Advanced Options
Advanced options can be used to refine your betting tree rules.

- Always add all-in (Dynamic) – When checked, this option will ALWAYS add the option to go all-in, regardless of your other advanced settings. If Unchecked, all-in will be added only if the solver deems it to be an optimal sizing at that point. The solver starts to consider all-ins as an option if a shove is below the Add all-in threshold or if the user specified that it should consider a shove at that point.

- Force all-in threshold – Replace bet sizes greater than X% of the effective stack with an all-in shove. For example, if the effective stack is 50bb, and you have this set to 80%, then any bet or raise greater than 40bb would automatically be converted into a shove. This setting is used to prevent awkward pot-committing sizing (Set this to 100% to disable).
- Add all-in threshold – This determines how deep you need to be before the solver considers shoving as an option. If a shove is less than X% of the pot, a shove will be added. Note that if you’re using Dynamic or Automatic, the shove may be removed if it is deemed to be a suboptimal sizing (Set this to 0 to disable, or set to a high number to permanently enable).
- Bet size merging threshold – This will remove bets and raises that are too close to the same size. Merging bet sizes can help clean up your tree by removing redundant strategies. The merging algorithm works from the top down, starting with the largest bet size and eliminating all bet sizes that fall within the merging threshold. Two bet sizes are within the merging threshold of X% if they meet this condition:
X% > (1 + Higher) / (1 + Lower) – 1
For example, a 50% and 25% pot-sized bet would be merged if X was greater than 20% because (1.5 / 1.25) – 1 = 0.2% (Set this to 0% to disable).
Node/Tree Editing
Select the Tree Edit dropdown to open this menu. This allows you to edit and preview the betting tree at specific nodes (decision points).

Select the Edit Node pencil icon in the bottom-right corner of any decision point.

You can add, remove, or edit the bet sizes from here. You can even delete the ability to check or fold, if you want.
Select the + icon to add a new size, and select the x button to remove an action. You can hover over the dropdown next to each size to change the bet sizing input between bb, pot %, geometric, or a multiple x.

Alternatively, you can Edit Nodes after a solution is already built. Again, just hover over any decision and press the edit node button.
Learn more about node editing!
Summary Page
The Summary tab is used to overview your entire solution. This shows each street’s ranges, stack, pot, and betting tree settings.
You can access the summary tab by selecting the show info button ⓘ in the solution selector:

Alternatively, select the Summary tab in the top-right corner of the solution builder:

Select The Board Cards
The last step is to select the flop! Note that you can always change the board cards later! It only takes a few seconds to solve. Custom Solving is an exclusive feature only available to Elite Tier users. However, anyone can solve the Q♠T♠7♥ flop for free. All the features are fully available with any set of parameters on this flop.

Edit Solution
After you’ve solved a spot, you’ll notice an EDIT button in the Solution Selector. Select the EDIT button to open the solution builder and adjust the solver parameters.

Saving, Loading, & Organizing
You can organize many things in GTO Wizard with tags! For example, your preflop ranges, custom solutions, solver parameters, board filters, and training drills can all be organized with tags. Tagging allows you to assign useful categories to items, then filter for those items. We find tags to be a superior organizational tool compared to folders. Tagging permits many-to-many mapping (i.e., many tags assigned to many things). In contrast, folders permit only a one-to-many mapping (i.e., only one folder assigned to several things). This allows a much more flexible range of customization.
To create a new tag, click the Assign Tags button or select an already-assigned tag.

Give your tag a name and a color, and press confirm.
Select the three dots ⋮ to the right of each item to rename or delete saved items.
Use the drag handle on the left-hand side to rearrange your saved items.


Select the Filter Tags dropdown to filter your saved items by tag:

You can specify if it should match any tag (all items matching at least one tag will be shown), or you can choose to match all tags (only items that match all specified tags are shown).

Give your tag a name and a color, and press confirm.
Select the three dots ⋮ to the right of each item to rename or delete saved items.
Use the drag handle on the left-hand side to rearrange your saved items.
Select the Filter Tags dropdown to filter your saved items by tag:
You can specify if it should match any tag (all items matching at least one tag will be shown), or you can choose to match all tags (only items that match all specified tags are shown).
Saving/Loading Ranges
Keep in mind you can always load ranges from pre-solved solutions using the PREFILL function. However, many players prefer to use customized ranges.
To save your ranges, open the range editor, then select the save button in the top-left corner. Give it a name and save the range for later use! Saved ranges are displayed in the right panel. Click to load the range for whatever player is currently selected.

You can organize your ranges using tags. For example, here I have assigned a tag called “BB Defense” to the BB calling ranges in single-raised pots. Now I can filter with this tag to quickly see the relevant BB defense ranges!

Saving/Loading Parameters
Parameters define your custom solution settings! If you’ve spent any time building the perfect betting tree, you’ll want to save those settings for future use. To save your parameters, select the save button located in the bottom-left corner of the Solution Builder.

Select the Load button to open the saved parameters:

As always, you can organize and filter your saved settings with tags.
Saving/Loading Custom Solutions
Open the Solution Selector in the top-left corner of Study Mode. Select the Custom Solutions tab.
Here the menu is divided into two spots: Saved solutions on the left, and recently solved solutions on the right:

Select the floppy disk icon to save a recently solved solution.
Give it a name and assign tags to organize your saved solutions!

Alternatively, you can add them to your saved spots by selecting the Saved Spots menu or pressing M.
GTO Wizard the #1 App for Poker players